What can this Gaming Mouse Software do ?
This Gaming Mouse Software can do Automatic Clicking. The Automatic Mouse Clicking can be Started and Stopped by doing a Right Mouse Click. Yes you can even control how many times this Software simulates Clicking of Mouse. Apart from Click Count, you can even control the speed at which automated Clicking is done by this Mouse Clicking Software.
Does this Clicking Software works in all Games ?
Yes, it works in all Games, irrespective of whether they are Full Screen Games or Browser Games. it simulates Clicking of Mouse on a lower level so that Games see the Mouse Clicks as coming from actual Mouse Control.
Does this Gaming Mouse Software requires a special Mouse ?
This Gaming Mouse Software work with all types of Mouse. Whether you have a Logitech Mouse, a Microsoft Mouse, iBall Mouse or any other basic or advanced Mouse, this Gaming Mouse Software works with all.
How do i Install this Gaming Mouse Software ?
Installation of this Gaming Mouse Software requires you to have Admin Access to your Windows Computer. This Gaming Mouse Software is bundled with Auto Clicker which you need to download and install in order to use this Gaming Mouse Software. The Installation procedure requires you to download and install a Device Driver for which tutorials are provided below.


Steps to Install Gaming Mouse Software
Before Installing this Gaming Mouse Software, you must understand that it requires an Additional Device Driver. In the given below procedure, you would download and install a Device Driver. You would need to have Admin Access to your Windows Computer in order to Complete the Software Installation. Either follow the steps below to Install this Gaming Mouse Software or Watch Video Tutorial which displays all the steps required to Install the Gaming Mouse Software.

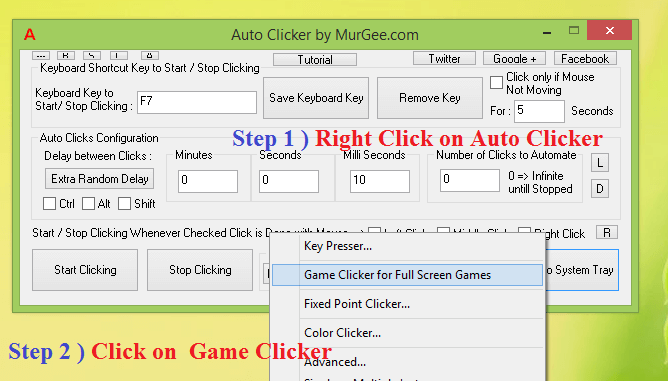
- Launch Game Clicker from the Right Click Menu of Auto Clicker. Note that when launched first time, the Game Clicker would ask you whether you wish to download the Installation Helper for the Gaming Mouse Software (referred with the name Game Clicker ) ?
- When the Software asks you permission to download the Installation Helper, Click Yes and wait for the Installation Helper to be Launched.
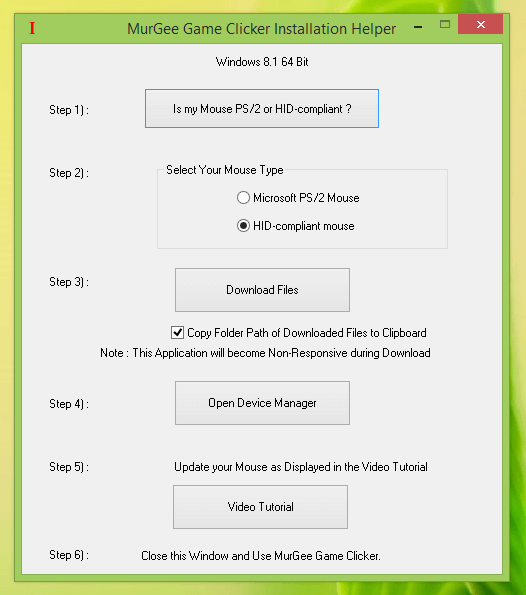
- The Gaming Mouse Installation Helper displays all the steps required to download and install the Gaming Mouse Software. Yes it also allows you to view / download a complete Video Tutorial displaying the Complete Installation and Uninstallation Procedure.
- View the Gaming Mouse Software Installation Screen carefully and do watch the Video Tutorial.
- As Displayed in the Screenshot above, first you would need to identify your Mouse Control. Typically Mouse Controls are either of 2 Types including PS/2 Mouse or HID Compliant Mouse. Once you have Identified your Mouse Type, you can proceed to the next step.
- Click on the button Download Files and then wait for a couple of seconds to let the Gaming Mouse Software Files to be downloaded and stored onto your Windows 8.1, Windows 10 or Windows 11 Computer. With default settings, the Gaming Mouse Software Files are downloaded to a Temporary Folder and it's path is coped to Clipboard.
- Now Click on the button Open Device Manager to view Device Manager Application of Control Panel.
- Locate your Mouse in the Device Manager, Right Click on it and Click on Update Driver.
- In the Device Driver Update Wizard, follow the steps to Manually Update Device Driver of your Mouse Control and complete the Installation.
- Finally Close the Installation Helper and your Gaming Mouse Software is ready to do Automatic Mouse Clicking in Full Screen and other types of Games.
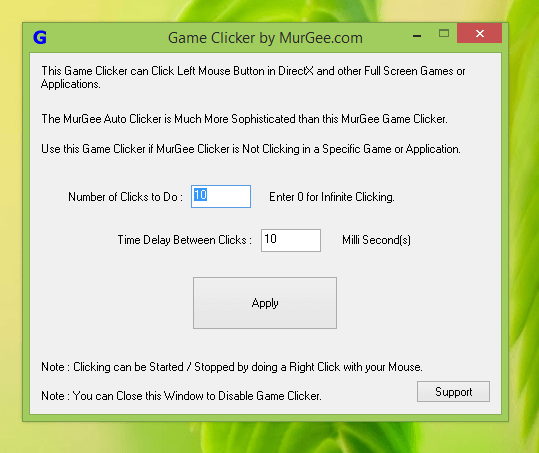
- Enter the Number of Clicks you want this Gaming Mouse Software to do and also enter the Time Delay between consecutive Clicks, finally Click on the Apply Button.
- To Start Automatic Clicking, do a Right Click with your Mouse. The Automatic Clicking will stop automatically after the Number of Clicks Configured. You can Abort the Automatic Clicking by either doing a Right Click Again or by Closing the Game Clicker window.
Steps to Uninstall Gaming Mouse Software
Uninstalling the Gaming Mouse Software is really easy and requires lesser number of steps as compared to Steps required for Installation. Yes you would need to have Admin Access to your Windows Computer and rest all is easy. Either follow the given below steps or Watch Video Tutorial which Displays how you can Uninstall Gaming Mouse Software.

- Open Device Manager from Control Panel.
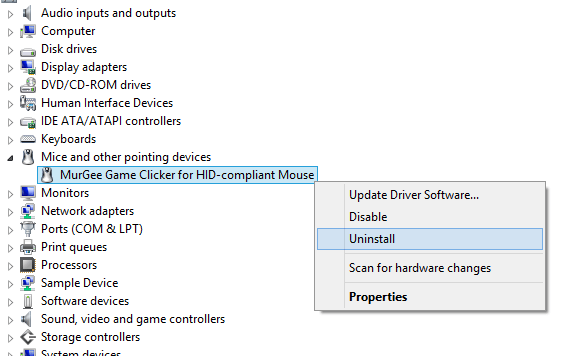
- Locate your Mouse in the list of Devices, Right Click on your Mouse Name and Click on Uninstall.
- Select the Option to Delete Driver Files and Click on OK.
- A Computer Restart Might be required, depending on make and model of your Mouse.
- Uninstall Auto Clicker from Add / Remove Programs of Windows Control Panel.